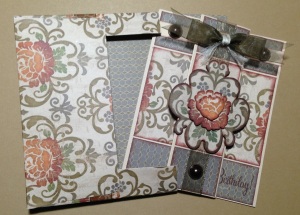
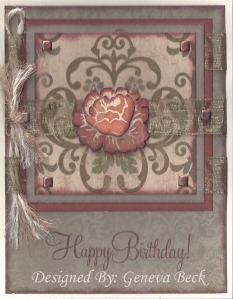
This is a display card made from the Huntington Paper Collection. It has lots of layers to create depth to the pattern. Front and Back views of the card. I had to custom make a envelope for this one for it was to thick for the standard envelope.
Archives
Birthday Card using Huntington Paper Collection
Paper and Measurements:
Colonial White Cardstock:
1 – 8 ½” x 5 ½”
Barn Red Cardstock:
1 – 3 ½”x 3 ½”
Slate Cardstock:
1 – 3 ¼” x 3 ¼”
Huntington Paper Pack:
Flower Print:
1 – 3”x3”
Gray Pattern Paper:
1 – 5 ¼”x4”
Flower Segment:
Cut 2 flower segments form the flower print. 1 – Complete flower and 1 center of flower.
Other Materials Needed:
Colonial White Envelope for Card
Green Organdy Ribbon:
3 – Pieces 5” Long
Square or Round Copper Brads:
6 – Brads
Bakers Twine:
1 – 10” piece, 2 – 3 ½” pieces
Designed By: Geneva Beck
Oct. 2013
Birthday Card: Huntington Paper Collection
Things needed to complete project:
Huntington Paper Pack
Stamp Set: D1475 Card Chatter Birthday
Stamp Set: D1550 Happy Autumn
Ink Pads: Barn Red, Slate, Olive (dauber for each color)
Basic Work Supplies:
Paper Cutter, Liquid Glass, Scissors, Glue Dots, Chip Board
Prep Papers:
Score and Fold 1 – 8 ½” x 5 ½” piece of Colonial White Cardstock in half. This will make a 4 ½” x 5 ½” card.
Directions:
1. Using daubers and the stem flower daub desired color combination onto the desired sections of the flower and starting in the center inside of the card stamp image in the middle of the bottom of the card. Repeat across each side of the image across the length of the card. Also use this method and stamp image onto the back bottom edge of the card and on the front bottom left corner of the envelope.
2. Using a dauber distress the edge first with olive ink and follow with barn red ink on all edges of both the pattern papers and the cardstock pieces.
3. Using liquid glass, glue the 3 ½” x 3 ½” piece of Barn Red Cardstock to the Grey Pattern Paper leaving just under ¼” from top and two sides of the card.
4. Using Barn Red Ink, stamp Happy Birthday evenly between the bottom edge of the Barn Red Cardstock and the bottom edge of the Grey Pattern Paper.
5. Using liquid glass, glue the 3” x 3” piece of Flower Paper to the
3 ¼” x 3 ¼” piece of Slate Cardstock set aside.
6. Apply a glue dot to the ends of the first piece of ribbon and place it across the Grey base page starting at the top ¼” down from the top of the Barn Red Cardstock. Then a second piece ¼” up from the bottom of the Barn Red Cardstock.
7. Using liquid glass glue the Slate Cardstock with the Flower paper on top of the Barn Red Cardstock and over the ribbon evenly spaced.
8. Apply glue dots to the remaining piece of ribbon and place it across the middle of the Grey Base Paper so that you cover the middle of the flower.
9. Pierce the flower paper with a paper piercing tool about ¼” from each of the four corners of the Flower paper. Place a brad in each hole and fold down the ends being sure to flatten them.
10. Pierce through the middle piece of ribbon on the edges of the slate cardstock piece being sure to stay in the middle of the ribbon. Place brads in holes and fold down the edges.
11. Using liquid glass glue your prepared base page to the card front evenly spaced on all sides.
12. Fold the 10” piece of Bakers Twine in half and insert it under the top ribbon at the folded edge of the card. Lay it over the middle piece of ribbon and under the bottom ribbon piece. Fray your tails and trim if necessary. Tie the 3 ½” pieces of Twine around the center to create a bow tie one at a time. Fray and trim the edges.
13. Distress around both flower segments you cut out from the Flower Paper. Chip board the smaller segment and glue to the larger segment. Chip board and glue to the top of the Flower on the card front.
Finished,
You now have a beautiful blank Happy Birthday Card to send to special Friends and Family.


You must be logged in to post a comment.